Overview
As a SharePoint power user you probably face with a task of advanced field managing in list item forms. You might need to hide or disable a field in a list item form before it is displayed to a user, depending on some condition you define. FormDesigner is a cutting-edge application for SharePoint 2013 which enables you to do so easily!
It’s implemented as an app part that can be added to Display, Edit or New list item form (only ListFormWebPart is supported). The app part has a few of simple properties. Conditions for visibility and availability of fields are defined in a XML settings file which is stored in the settings library of the app.
It’s implemented as an app part that can be added to Display, Edit or New list item form (only ListFormWebPart is supported). The app part has a few of simple properties. Conditions for visibility and availability of fields are defined in a XML settings file which is stored in the settings library of the app.
Demo limitations
FormDesigner Demo may manage only one field of a list item form (only the first target field in the XML settings file will be processed).
Setup
1. Install and add the FormDesigner app to your site. Click to open it. On the app settings page select a Source list – the name of a list that contains fields to be managed by the app:

Click the "Save Settings" button to save the app settings for the selected list. You can configure FormDesigner for any number of lists you like.
Click the "Remove Settings" button to remove the app settings for the selected list.
Click the "Go back" button to go back from the app settings page.
NOTE. The FormDesigner app requires a field for app internal use to be created in the selected list. The hidden text field will be created on saving settings. You can always remove the field from the list by removing settings.
The app doesn't work in IE8.
If after the app initial installation you want to update the app with it's next release from Office Store, please consider these setup steps:
1. Remove the FormDesigner folder from the Site Assets document library of your target site.
2. Remove the FormDesigner app from your site.
3. Download the updated FormDesigner app from Office Store and install it.
4. Open the updated app, on the app settings page select any target list from the Source list and click the "Save Settings" button to finish the setup (you don't need to repeat this step for all target lists).
2. Find FormDesignerAppPart in the "Apps" category of the site web part gallery and add it to the list item form (e.g., EditForm.aspx) at the bottom of the page:

NOTE. The list item form must be ListFormWebPart.
Use the "Edit Web Part" link to open the FormDesignerAppPart properties. In the "FormDesigner properties" section adjust the following properties:
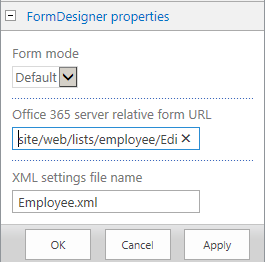
- FormMode – select an option that defines the list item form mode:
- Default – the form mode (Display, Edit or New) will be determined by FormDesigner automatically (the default form will be used);
- Display – the form is a non-default Display form;
- Edit – the form is a non-default Edit form;
- New – the form is a non-default New form.
- Office 365 server relative form URL – set the server relative form URL (e.g., /site/web/lists/list/EditForm.aspx) if FormDesigner is used on a web that is hosted on Microsoft Office 365.
- XML settings file name – enter a XML settings file name that defines conditions for visibility and availability of list item form fields.
NOTE. If a list has several list item forms of certain type, e.g., a few of Display forms, and it is necessary to use FormDesigner for a form which is not set as the list default form, then you should explicitly select the form mode from the option list (e.g., “Display”).
Hide FormDesignerAppPart from users by checking the “Hidden” checkbox in the “Layout” section.
3. Create the XML settings file.
<?xml version="1.0" encoding="utf-8" ?>
<Definitions>
<Definition BreakIfTrue="true">
…
</Definition>
</Definitions>
When set to “True”, the attribute states that the next Definition will not be processed if a condition in a Definition being processed is “True”.
A Definition can contain an optional attribute ContentType. If the attribute is set, then the definition will apply only for list items of the specified content type when they are displayed in the form.
An optional child element When has a syntax similar to CAML and is intended for describing conditions for visibility and availability of list item form fields.
The Elements DispForm, EditForm and NewForm define fields that should be hidden or disabled in the appropriate form, e.g.:
<Definition BreakIfTrue="true">
<ContentType Id="0x0100FF309AD185232A44AB416D978019E4CE"/>
<When>
…
</When>
<DispForm>
…
</DispForm>
<EditForm>
…
</EditForm>
<NewForm>
…
</NewForm>
</Definition>
If the When element is set, then these elements are processed only if the condition defined in the When element is “True”.
The following operators and expressions can be used inside the When element:
3.1 Logical and comparison (borrowed from the CAML query scheme):
- Or: <Or><A><B></Or>
- And: <And><A><B></And>
- Eq: <Eq><A></Eq>
- Geq: <Geq><A></Geq>
- Gt: <Gt><A></Gt>
- Lt: <Lt><A></Lt>
- Leq: <Leq><A></Leq>
- Neq: <Neq><A></Neq>
- IsNull: <IsNull><A></IsNull>
- IsNotNull: <IsNotNull><A></IsNotNull>
3.2 User Group/Role membership:
<UserId>User ID</UserId>
<Groupname>Group name</Groupname>
</InGroup>
The UserId element defines an ID of a user whose group membership is checked against the group name defined in the Groupname element. You can use $User.Current.Id as User ID for the current user.
<UserId>User ID</UserId>
<Rolename>Permission level</Rolename>
</InRole>
The UserId element defines an ID of a user who should have a permission level defined in the Rolename element. You can use $User.Current.Id expression as User ID for the current user.
3.3 Field:
You can also use the following expressions as field value:
3.4 Custom:
<Not>
<Or>
<IsNull>
<FieldRef Name=”Title”/>
</IsNull>
<Eq>
<FieldRef Name=”Title”/>
<Value Type=”Text”>Example</Value>
</Eq>
</Or>
</Not>
In the next example we define a condition that checks if the current user is a member of the “Managers” group, his revenue is lower than $100 000 and he works at “Corporate Sales” department:
<When>
<And>
<And>
<InGroup>
<Groupname>Managers</Groupname>
<UserId>$User.Current.Id</UserId>
</InGroup>
<Lt>
<FieldRef Name="Revenue" />
<Value Type="Currency">100000</Value>
</Lt>
</And>
<Eq>
<FieldRef Name=”Department” />
<Value Type=”Lookup”>Corporate Sales</Value>
</Eq>
</And>
</When>
The DispForm, EditForm and NewForm elements define a set of fields that should be managed by FormDesigner in an appropriate list item form (i.e., Display, Edit and New).
The mandatory attribute Fields contains Field child elements. The following attributes are used in the Field element:
<EditForm>
<Fields>
<Field Name="Title" Readonly="true"/>
<Field Name="User" Visible="false"/>
</Fields>
</EditForm>
NOTE. Do not make invisible and readonly mandatory fields because in that case you will not be able to save a list item form.
The XML settings file must be uploaded to the settings library of the FormDesigner app web.
Use the "Edit Web Part" link to open the FormDesignerAppPart properties, then use the “Settings library” link in the FormDesignerAppPart to upload the file:

To accomplish that, we use the following XML settings file:
<?xml version="1.0" encoding="utf-8" ?>
<Definitions>
<Definition BreakIfTrue="true">
<When>
<And>
<Not>
<InGroup>
<Groupname>ContentAdmin</Groupname>
<UserId>$User.Current.Id</UserId>
</InGroup>
</Not>
<IsNotNull>
<FieldRef Name="Salary"/>
</IsNotNull>
</And>
</When>
<EditForm>
<Fields>
<Field Name="Account" Readonly="true"/>
<Field Name="Location" Readonly="true"/>
<Field Name="Department" Readonly="true"/>
<Field Name="Title" Visible="false"/>
<Field Name="Salary" Visible="false"/>
<Field Name="Dismissed" Visible="false"/>
</Fields>
</EditForm>
</Definition>
<Definition>
<EditForm>
<Fields>
<Field Name="Title" Visible="false"/>
</Fields>
</EditForm>
</Definition>
</Definitions>

- InGroup:
<UserId>User ID</UserId>
<Groupname>Group name</Groupname>
</InGroup>
The UserId element defines an ID of a user whose group membership is checked against the group name defined in the Groupname element. You can use $User.Current.Id as User ID for the current user.
- InRole:
<UserId>User ID</UserId>
<Rolename>Permission level</Rolename>
</InRole>
The UserId element defines an ID of a user who should have a permission level defined in the Rolename element. You can use $User.Current.Id expression as User ID for the current user.
3.3 Field:
- FieldRef (borrowed from the CAML query scheme):
- Value (borrowed from the CAML query scheme):
You can also use the following expressions as field value:
- $Now.Date – current date and time,
- $NullDate – null date,
- $Now.Date.Year – current year,
- $Now.Date.Month – current month,
- $Now.Date.Day – current day,
- $User.Current.Id – current user’s ID,
- $User.Current.Name – current user’s name,
- $User.Current.LoginName – current user’s login name.
3.4 Custom:
- Not: <Not><A></Not>
<Not>
<Or>
<IsNull>
<FieldRef Name=”Title”/>
</IsNull>
<Eq>
<FieldRef Name=”Title”/>
<Value Type=”Text”>Example</Value>
</Eq>
</Or>
</Not>
In the next example we define a condition that checks if the current user is a member of the “Managers” group, his revenue is lower than $100 000 and he works at “Corporate Sales” department:
<When>
<And>
<And>
<InGroup>
<Groupname>Managers</Groupname>
<UserId>$User.Current.Id</UserId>
</InGroup>
<Lt>
<FieldRef Name="Revenue" />
<Value Type="Currency">100000</Value>
</Lt>
</And>
<Eq>
<FieldRef Name=”Department” />
<Value Type=”Lookup”>Corporate Sales</Value>
</Eq>
</And>
</When>
The DispForm, EditForm and NewForm elements define a set of fields that should be managed by FormDesigner in an appropriate list item form (i.e., Display, Edit and New).
The mandatory attribute Fields contains Field child elements. The following attributes are used in the Field element:
- Name – sets a field internal name, mandatory;
- Readonly – if “True”, a field will be rendered in Display (read only) mode despite the form type;
- Visible – if “True”, a field will be hidden in the form.
<EditForm>
<Fields>
<Field Name="Title" Readonly="true"/>
<Field Name="User" Visible="false"/>
</Fields>
</EditForm>
NOTE. Do not make invisible and readonly mandatory fields because in that case you will not be able to save a list item form.
The XML settings file must be uploaded to the settings library of the FormDesigner app web.
Use the "Edit Web Part" link to open the FormDesignerAppPart properties, then use the “Settings library” link in the FormDesignerAppPart to upload the file:
Use case
Let’s assume that we have a list of employees with the following fields:- Title - Text
- First Name - Text
- Last Name - Text
- Account - User
- Interest - Note
- Birthday - DateTime
- Location - Choice
- Salary - Number
- Dismissed - Boolean
- Department - Lookup
To accomplish that, we use the following XML settings file:
<?xml version="1.0" encoding="utf-8" ?>
<Definitions>
<Definition BreakIfTrue="true">
<When>
<And>
<Not>
<InGroup>
<Groupname>ContentAdmin</Groupname>
<UserId>$User.Current.Id</UserId>
</InGroup>
</Not>
<IsNotNull>
<FieldRef Name="Salary"/>
</IsNotNull>
</And>
</When>
<EditForm>
<Fields>
<Field Name="Account" Readonly="true"/>
<Field Name="Location" Readonly="true"/>
<Field Name="Department" Readonly="true"/>
<Field Name="Title" Visible="false"/>
<Field Name="Salary" Visible="false"/>
<Field Name="Dismissed" Visible="false"/>
</Fields>
</EditForm>
</Definition>
<Definition>
<EditForm>
<Fields>
<Field Name="Title" Visible="false"/>
</Fields>
</EditForm>
</Definition>
</Definitions>
If the business requirement is met, then the Edit Form will look like this:
No comments:
Post a Comment